

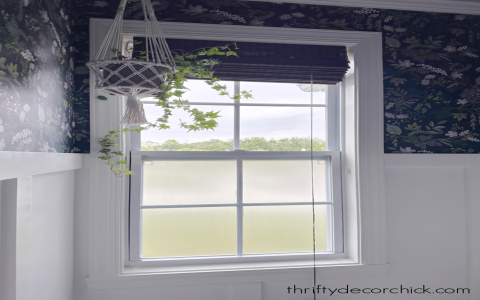
So, the other day I was messing around with some glass panels, just trying to see what I could do with them. I got this idea to give them a frosted look, you know, that kind of hazy, opaque thing that lets light through but you can’t really see through it clearly. It’s pretty cool for privacy and just looks nice, right?
I started by gathering my stuff. I had some regular glass panels that I wanted to work on, and then I remembered I had this acid etching cream somewhere in the garage. That stuff is pretty neat – you put it on the glass, and it kind of eats away at the surface, making it all rough and frosted. Alternatively, I can use sandblasting which is quicker but also messier.


First things first, I cleaned the glass panels really well. Any dirt or fingerprints can mess up the etching process, and you won’t get a clean, even look. I just used some regular glass cleaner and a soft cloth. After that, I make sure the glass panels were completely dry. Water can also interfere with the acid, so I wiped them down and let them air dry for a bit.
- Clean the glass
- Apply etching cream or use sandblasting
- Wait and let the magic happen
- Rinse and clean again
Steps I took
I apply the etching cream, just following the instructions on the bottle. Usually, you have to spread it on evenly and let it sit for a certain amount of time, maybe ten or fifteen minutes. But if using sandblasting, I wear my respirator and protective eyewear to blast away the surface of the glass to create that frosted texture.
While the cream was doing its thing, I kept an eye on it. I wanted to make sure it wasn’t getting too thin or drying out in spots. If that happens, you might get uneven patches, and that’s not what I was going for. If I am using sandblasting, I made sure to blast evenly across the surface, moving the nozzle back and forth in smooth strokes.
After the time was up, I rinsed off the etching cream with water. You have to be pretty thorough here because you don’t want any of that acid lingering on the glass. For sandblasting, I just give it a quick wipe to remove any dust.
And there you have it! The glass panels now had this beautiful frosted look. It’s like magic, really. The light comes through all soft and diffused, and you can’t see through it clearly anymore. It’s perfect for bathroom windows or any place where you want some privacy without blocking out the light completely.
I even tried applying some frosted window film on another panel. This stuff is way easier. You just cut it to size, peel off the backing, and stick it to the glass. It’s not as permanent as etching, but it gets the job done and looks just as good.
So yeah, that’s my little adventure with frosted glass. It was a fun experiment, and I’m pretty happy with how it turned out. It’s amazing what you can do with a few simple materials and a little bit of know-how. Now I’ve got these stylish, privacy-enhancing panels, and I didn’t even have to spend a fortune on them. Pretty cool, huh?


